Showing posts with label DIY. Show all posts

Monday, December 17, 2018

A NEW REPURPOSED PROJECT


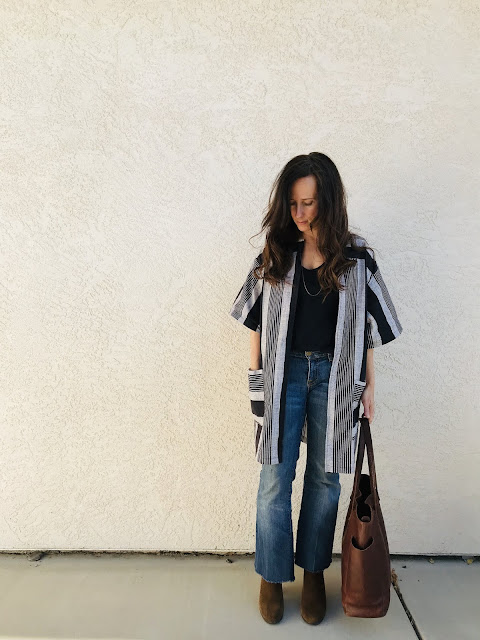
A couple of years ago I found this huge vintage dress (too bad I didn't take a before photo!) and I really liked the simple black and gray stripe print. I bought it with plans to turn it into a simple little dress, and this is how it turned out. By the way, how cute is my little side kick (Sophie). She was about 4 here. 


It was fun and I loved the deep pockets as well.


Fast forward a few years later. We traveled a bit and had stuff in storage but this was a piece that I wanted to keep (call it sentimental, or also just because I really liked it so much) so I never got rid of it during our different seasons of purging stuff. But after settling into a home of our own again I was pregnant with Royal and it didn't work for long as maternity. Over the past year as I have been breastfeeding it really hasn't been practical either, and I really wanted to wear it. 

After thinking it over I decided on a way to make it functional for this season now and I'm happy with how it turned out.


I just cut it down the middle and made it into a light weight jacket. This was super easy and now I get to wear it again!


 Now, these photos were taken about a month ago and it doesn't really get too cold here. But the temperatures have dropped and now I like to wear it with a black long sleeve or turtleneck as well. It's functional for warm temperatures or cooler ones which I really like.

I don't always make our clothes or buy second hand (there are times when we buy brand new, it's just not super often). However, I'm a big fan of reusing what we have or even reusing/recycling second hand clothes. I feel like it can be overwhelming sometimes to think about how much stuff is being made and sold everyday, when (if you are anything like us) we have plenty and don't really need more. But I also know it can be fun to have something new and enjoy it. So, many times this is a creative way for me to make something new and have a little fun. Because moms need a little fun too!


I hope this little DIY experiment inspires you to be creative the next time you want a little something new for yourself. And who knows, you may just find that little something in your closet that just needs a bit of tweaking to make it something special!


Stephanie xoxo


Saturday, December 1, 2018

CRAFTING WITH KIDS


Throughout each week we usually allow time to make something. It's something that I enjoyed as a child and still do. Creating with my hands has always been therapeutic, and it's a confidence booster with my kids when they can see how they can do things as well and be proud of it. 

So, this has become something that is very normal in our home, whether it's learning to sew, weave, draw, paint, etc....really anything creative. 

I do have to say that when I am teaching them something new, or if we want to make something that they will want to keep for a while and it will last, I am involved in the process. I would never just give them instructions and let them go at it. 


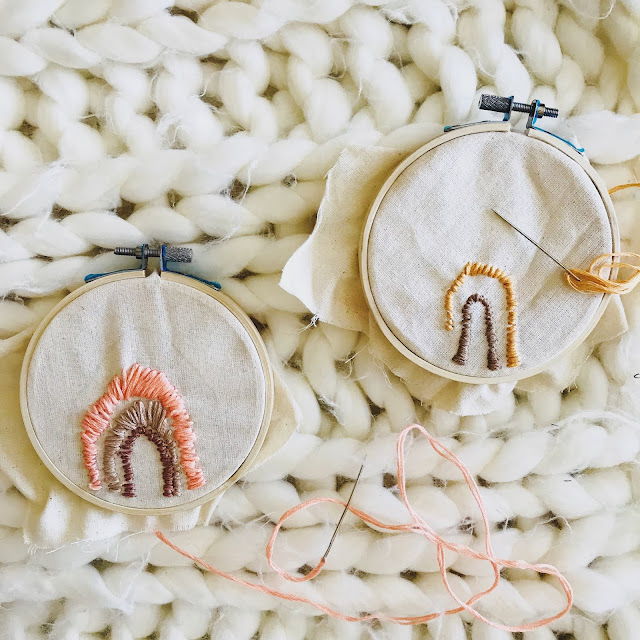
Like this hand stitching project for instance. I was there with them to help thread the needle if they needed it, and I assisted if they got knots or kinks in the thread. This particular project was done in different sessions. So, we would do about 30 minutes at a time on a particular day to work on it. Much longer and they would either become frustrated or tired. So there is patience involved and it's something that is not finished in a day, but something to work on and come back to later to finish.


This hand stitching was pretty easy. Here's what we used to make them:

-muslin fabric
-embroidery floss
-wooden sewing hoops
-needle (we used the thicker ones because they are not as pointy as the little ones)
-scissors
-pencil

I used muslin fabric that you can find pretty inexpensive at a local craft store. You could also just use something you have on hand at home (an old sheet or pillow case.....this also looks really cute on a color or printed floral fabric, especially if you are stitching words). The embroidery floss is at most crafts stores as well. I chose pastels and neutrals because I knew that would make it easy for them to choose from. I let them choose 4 to 5 colors each (and it's okay to guide them if they need help). Many times I will show them an example on the internet (Pinterest) to give them an idea of what we are trying to make. 
We snapped the fabric into place on the sewing hoops, and then I took a pencil and lightly drew 4 to 5 lines for their rainbow. This helped them stay on the right line for each color.


As I said, these are a work in progress and I haven't taken photos of the finished product, but I will likely share them later on when they are finished.

This is a fun little project for grownups and kids alike. A pretty inexpensive craft to make, and it's great for little hands to practice!

Happy Sewing!

Stephanie xoxo

Monday, April 10, 2017

A NEW (REPURPOSED) APRON

I have been eyeing some work aprons on Pinterest like this one and this one , thinking of how fun and practical it would be to have one (or two). Just to throw it on over regular clothes and it doesn't matter if it gets messy, but it still looks cute, AND it has pockets! Now of course making one of these from scratch would be lovely, and probably not too terribly difficult. But in these days of transition for us I just don't have that luxury. So, a repurposed project will work just fine.

These days of still living out of a suitcase I don't have tons of options to shop or chances to sew as much as I once used to in our own home. BUT thankfully wherever we have stayed I have had tons of friends and family that have had a sewing machine that I could borrow!Traveling around this past year has not taken away my sewing itch and this was a nice little treat for myself. Now, the pictures aren't the greatest to show detail or anything, but I thought it would be fun to share.

I happened to find this old army green linen jumper at the thrift store a bit ago and knew it would work just fine for a quick remake into an apron. All it needed was one cut down the back and then I sewed down the raw cut edge. It even came with the two ties that I just removed and placed them closer together in the back.


I didn't get a before and after of this one, but I'm already planning on making one more. So, hopefully I will add more photos and you can see the front as well. This one comes with deep square pockets on the front which fit the bill for what I was looking for.


That's one thing I love about sewing for myself or my kids. It doesn't have to be perfect, and it's fun to mess around and try new things. Plus, repurposing makes it so much quicker, which I'm all about!

Tuesday, December 6, 2016

HANDMADE GIFTS

It's Christmas time and I'm always looking for inspiration to make a few handmade gifts for my girls (and even Brandon) this time of year. I still haven't made up my mind completely yet, and there is still time. But in the meantime I decided to 
make this fun little video of Ruby's birthday gift I made for her a few months ago. We make a lot of homemade/repurposed gifts around here (especially on a tight budget).  I'm hoping to get inspired soon with a few new ideas and hopefully this will spark some ideas for you too!


(if you have a hard time viewing the video directly from here you can see it on my Instagram here )

  The bear was made from an old sweater, I made the bedding and pillows from some fabric scraps, the suitcase was from Amazon, and I found the doily from a craft store. I even found a little Dr. Seuss "Oh, the Places You'll Go" book at the dollar store to add for fun. Here's where I got the inspiration for the contents of the suitcase ... see here here , and here .

All in all it was a pretty inexpensive gift. Ruby (3 yrs old) and Sophie (5 yrs old) love putting things in a bag or box and toting them around, so this made for a perfect gift for this age. Lots of things to go in and take out of the suitcase. 


And there you have it. A bear in a suitcase. Horray for handmade gifts!


Friday, August 26, 2016

DIY REPURPOSED JUMPER FROM DAD'S OLD SHIRTS


A few weeks ago I mentioned I was going to share about Ruby's jumper here on Instagram. I just got around to loading some photos, so here you go! Before we left on our journey this summer I was trying to sort through quite a bit as I was packing. Lots of clothes to sort through with six people. Brandon had several button up dress shirts that didn't fit or that he wasn't going to wear anymore. A few of them I decided to keep and use for new jumpers for the girls. It's funny. A lot of times I get the sewing or creative itch to make something for fun, but sometimes it has come in handy just for practical uses as well. We have been on a tight budget, and knowing it was summer and it's always fun to give the girls something new to wear (I mean, they are girls...and what little girl doesn't love a new little outfit), I thought this fit the bill just fine. 

I had been eyeing several jumpers and overall dresses here and there , and felt like the fabric from Brandon's shirts would be great...and FREE! Since I was in a pinch for time and was trying to crank out several of these in the midst of packing up our stuff, I only managed to get one before photo. Hopefully you will get the idea, as it was a pretty quick and easy sewing project.

Here's the before (don't mind the wrinkles...no time for ironing either).


So, I simply cut off half of the shirt. Then, I cut a two inch wide strip directly above that to make the waist band as well. 


Next, I cut off the sleeves into two strips to make the straps. *Please note*, long sleeves work better for a longer strap for larger sizes. This particular jumper was for Ruby and I could get away with using the shorter sleeves to make straps for her because she is a petite one.


You could keep the existing hem at the bottom to make it easy. For this one I choose to make a larger hem. I then sewed up the back...this could be done with or without the buttons going down the shirt. (I chose to sew mine up without the buttons along the back to keep it simple)  I measured the straps according to the fit and sewed them on with buttons from the existing shirt. With more time you could make them adjustable with button holes. Some of the jumpers I made have buttons and some are without. I thought they could go either way, and changed it up with each one.


And there you go. Finished project!


I made a few in different sizes so they could all have at least one. Sophie's checkered one is one of my favorites. And if you don't have any old shirts, you can easily find some checked, striped, or even linen (if you're lucky!) men's shirts at the thrift store for a good deal.


They were so happy they did a little dance!


 Here's two more that made their way in their suitcases for this summer.


The floral one is made from an old dress I had when I was pregnant...same idea, but it was pleated a bit and had pockets already so that was a bonus!


The good thing about these jumpers is that they will last beyond the summer with long sleeves and tights. So, if you feel like giving it a try, it would work for the cooler weather coming up as well. Any thoughts and comments welcome! I'd love to know if any of you have tried this or are going to try it!


Tuesday, August 16, 2016

DIY PLATE ART


I tried a fun little DIY project that I was wanting to do for a while (see here and here for my inspiration). I had seen some really cute plates sold in the UK a while back that were out of stock, and when I came across these DIY plates I figured I would give it a try to replicate some of the ones I had been eyeing for so long. 

So, a thing or two about this project. It's very simple. I bought a few plates from the dollar store and one or two were inexpensive ones from the thrift store. I want my girls to have a try at their own plates but I wanted to give it a try first and make sure it worked, as I had read a few reviews and some were saying it didn't work depending on the plate or the marker. So these were cheap plates and I gave it a try with a few different styles first. 

All went well for the most part. Black marker definitely worked the best. I used two other colored Sharpies to see how it would work and the colors mostly faded once being heated (which worked out ok for the pink on some). 

You want to clean and dry your plate fully. Then, draw whatever you like on the plate. Next, heat the plate in a 450 degree oven for about 45 minutes. After the 45 minutes, turn the oven off and let the plates remain in the oven until the oven cooks down. Once they have cooled some remove them from the oven and let them finish cooling completely. Then for the test. I washed all the plates and they did totally fine. However, I will say (for whatever reason) I choose to scrub a few of them a ton, just to see if at some point they would fade or it would rub off. After several attempts the marker did begin to wear off some on a few of the plates (as you can see in the last photo). But I would say this a fun, cheap little project that is good for a little craft. So, I will let the girls have a go at it and then post those later. 

For any moms that may be conscious of the marker being on the food, I think it bakes in pretty well. I really did scrub them several times. And I think for us, I feel ok about letting the kids use these plates as a special snack or party plate rather than an everyday dinner plate, which may have more tendency to wear off the marker. 

Sunday, July 3, 2016

REPURPOSED ROMPER TUTORIAL

Okay, so it's been a while but I mentioned a tutorial a while back (see here ) about the jumper I made Sophie from an old dress of mine. Well, I went through some old clothes of mine and I found this jersey knit dress I had held onto because I liked the bird print and thought I may use it for something for the girls. So, I decided to make another romper and this one is for Ruby. This time I decided to share step by step as a mini tutorial. I've not done many of these "tutorials" so this will not be super in depth with amazing photos (cuz I just didn't have time to do all that), but for those that have some sewing experience I think you will get the idea and it should be fairly easy. 

So, here goes:


Here's the dress before. I think the bird print is super cute. *Note: you could probably use any fabric but I would suggest a jersey knit (tshirt type) dress because I simply cut a lot of the fabric and leave it without sewing the edge. This makes it much faster and easier to try it out. Jersey knit doesn't usually fray and if it does, it will tend to just roll a bit and it's not bad to leave as is, but that technique does not work for other fabrics...as they will fray and look messy.

This dress was a shorter (knee length) dress on me, so it's perfect for Ruby's size as a jumper with pants.


Now, I really wish I had a proper romper to use as a pattern for this, but we had just moved and were staying with friends while majority of our stuff is boxed away...so the best thing I could use for the length was her pajama onesie. I basically used it to get an idea for how long and where proportions should be (how wide, where the arm begins, etc.). If you have a summer romper, I would use that as your pattern to help guide. And always allow an extra inch away from the garment when cutting so you will have enough extra for sewing. Sometimes I allow 2 inches on the outside waist part so that it is not super snug, but these can be worn snug or loose. You can decide as you try it out for yourself. The good thing about the knit is that it will stretch.


Lay your onesie or romper on top of your dress and make sure the bottom of the leg is at the bottom of the dress. This way you will not have to hem the bottom because it is already stitched. Stretch the legs apart just enough where it lays natural (not too far apart because it will not work correctly). Then cut an upside down V shape for in between the legs.


Next, cut along the outside of the outfit (allowing that extra inch). At this point, with this specific dress, it had a seam that runs along the middle of the waist where it flared out at the bottom, so I stopped cutting once I reached that waist line. This is not the case for all dresses and you can just simply continue cutting a straight line all the way until you reach the armpit area, using your onesie outfit as your guide to know where to stop.


Now, you want to cut a slightly curved shape on both sides all the way up to the top of your dress that will be the arm holes. *Notice the dress extends past the baby outfit which is what you want because you want extra fabric to tie off the straps at the end.


This is what it should look like at this point. And if you look closely it is not perfect. This is just a quick, fun, project that's free! So, don't fret about the little stuff. When you sew the piece together, a straight stitch is what counts the most!


At this point, you could leave the neckline if you want, but I chose to cut mine off to match the rest of the raw edge look. It could go either way.


After I cut the neckline I simply sewed up the sides, starting at the bottom of the armpit corner and sewed down all the way to the bottom leg. Do this on both sides. Then, sew the inside of the legs together making that upside down V shape. And that's basically all the sewing there is. I then tie off the tops of the straps and left it as is. You could also sew the straps together if you wanted a flat strap. 


And there you go! This was an experiment that has worked for me so far for 2 of my kids. Depending on your sewing machine, you may want to double stitch the part that is between the legs to prevent ripping (for when kids like to stretch, tumble, or do a split!)...and for extra concern about a tear just allow the extra inch or two to make sure it's roomy enough.

Ruby still wears diapers, so to change her we simply pull the romper down and then back up again. For those that are adventurous enough to try for snaps or buttons, that would be awesome! For me, this was a super quick and easy DIY. We think it turned out pretty cute!!


Lastly, because this was mama made and I don't have an industrial sewing machine, I machine wash and line dry to extend the wear for these types of projects. Otherwise they will possibly shrink (as most little clothes do in a hot dryer), or could tear more easily from being washed and dried several times. This has worked for us and they have had several wears out of their new outfit.

Happy sewing!!